Wednesday 2 May 2012

At the end of the journey.

Overall, I enjoyed this module even I was struggled at the beginning, had chosen a tricky theme for fashion (I wanted to represent emotion, not copying idea from objects), and the silly choice of fabric for padding feather. 

Through checking my portfolio and blogs, I felt like it was a long journey.  It was hard, but I have got huge experiences from each step of this project.

And here is my abridged log, as my presentation sheets.


Sunday 29 April 2012

Week 29-2: Do my best.


No time for worrying, even there is a problem.
I had been thinking about preventing the feather keep coming out.
To be honest, the fashion show will be fine.
Just I am worrying for while I am sewing, because the coat needs to be moved inside out, up side down, turn, ironing...  so it will be covered with messy feathers everywhere if I did not do anything before I go to the next step. I needed a solution at least until I finish to make it.

I tried several experimentation.
The perfect solution was using Hotmelt. It is a thin sheet of plastic and is attached with heat. It is like a clear fusing but do not make fabric hard. However, unfortunately I did not have enough Hotmelt and I have no idea where I can get them in a few days.
For temporary, put PVA glue was also fine. It makes the fabric slightly stiff, but it prevents a lot. 
So I decided to do the way, before start sewing.


I tried to do my best, not only for this coat, but also for all the works which I have done for this module. 


The last movie is here.


Thursday 26 April 2012

Week 29-1: The last battle


Finally, I started to make the last one, the Fire Feather Coat. I was looking forward to making it because it is another complicating items for me. It has 123 pieces of fabrics and I need to do pockets, zips, facing, fusing, lining, and ...padding feather.
And the challenge became much harder than I had expected.
First, the fabrics were much heavier and thicker than calico.
Second, Suede has nap, so I had to take extra time and fabrics for cutting patterns. (I used shinier direction to fit to the orange fabric.)
Third, yes, the feather became a nightmare.


I am not going to excuse but when I made samples, the feather did not come out from the clear organza so much. And I believe the organza is the finest organza in London. So I thought it would be fine.But it may be because the samples were smaller. Or, another reason, I might dye too much and broke feathers.  I have regretted so much already. (It is very rare when I regret about something)


The last battle starts from here.


Tuesday 24 April 2012

Week 28-3: The Long shirt


Compare to the  Shadow Dress, the Long Shirt is much less complicating. And it is much easier than the dress because it does not have so much curve. However, because I did all seams by french seam, it took a bit longer time than I had expected.
I took extra care and made it as beautiful as I could. Even the tiny detail like 5mm width ribbons, are made by same silk chiffon tape. (It took for 4 hours to make them but I was really satisfied)

By the way, I am always making short movies to show processes. They are only a few minutes. But, in real work, of course I spend for much longer time. For example, even this shirt takes for about 30 hours except making the pattern. (I do not want to calculate how much I spend time for the Shadow Dress!) I think it is too much and I need to learn how I can do quicker.

So this is the time which  I spend for this shirt.

.

Monday 23 April 2012

Week 28-2: Second alteration


The final presentation and tutorial gave me a bit of alteration.

First, for the Layered Skirt, it was slightly strange silhouette, so I added another piece of fabrics onto hemline and make it better.


Another one is for the Hood Top.
The hood shape was slightly odd, so I cut the part which was marked in the tutorial.
I had to open seams for correcting the part, but it was not so hard work.


 For the shadow dress, the collar shape was still strange, so I fixed it and it had done in the process of real dress making.


The Long Shirt was fine, and the Fire Feather Coat had not done yet!

Week 28-1: The end of the Shadow Dress


Easter has finished. So I have to r\work hard. I have to finish the shadow dress first. Though I had got some alterations from the final presentation and tutorial, I needed to keep sewing this first. And I need to make two more in two weeks... it is very hard.
To be honest, I was really struggle to sew this silk chiffon. It is moves all the time and this dress is full of curve seams. Unfortunately, I could not sew french seams as nice as the polyester toile. However, I thought it was the my limitation at this moment, I have done my best, anyway.

The bitter battle is in this movie.

.

Tuesday 17 April 2012

Easter 3: The Layered Skirt


There are 6 different colour fabrics which I need to use for the skirt, 
so why not prepare 6 threads to match completely?


Luckily, I only had one change for the Layered Skirt that the waist belt need to change to elastic one. To be honest, I was thinking that it would be better than a normal flat waist belt, but I thought it does not looks 'Couture nor RTW', so I did not do it for my toile.


First, I made the basement exactly same as I did for the toile.


Attach the 2 panels with wrapped seam which I have done a lot for the Hood Top.


These are the front and back side. They are same except the centre back has a line.


Then it started endless hand sewing.
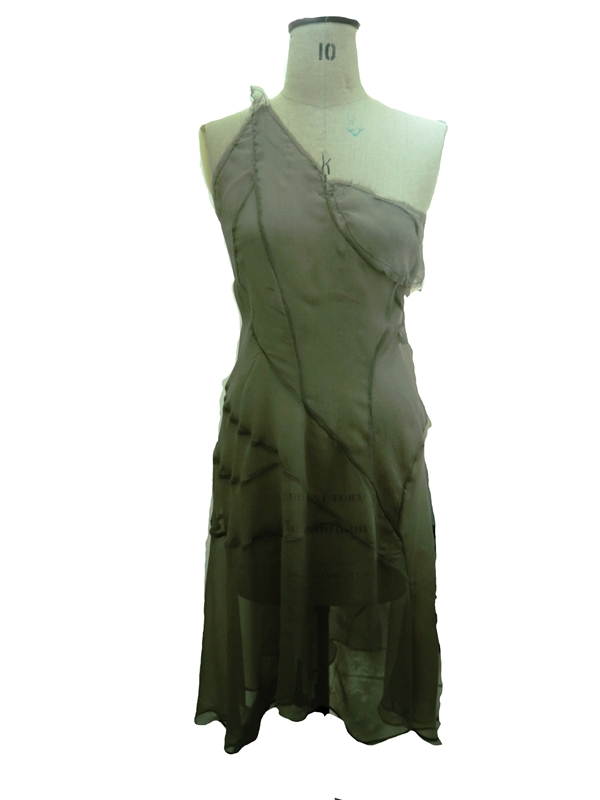
Because it is very spontaneous silhouette, I have to work on stand to see the balance of shape.
It does not have any marks where I should to put which piece of fabrics on. It is totally it depends on my sense. So the approach to this work is completely different from other four garments. Only the similarity is I need to do same thing for a long time.


Add nets underneath of layered fabrics to make much volume but lighter.


In the middle of the way. keep going!

 
I used about 9m of mixed fabrics. It must be heavy.


It is an endless work, so I have to stop when I thought it has done.


Then lastly, I replaced the waist part to the actual fabric (suede) one. Because the skirt becomes heavier, I did not want to let the suede to hold until the long time work finish. Because it might get loose or fray edges for being pulled for all the time.


Replacement is  also done by hand sewing because it is too thick and heavy for sewing machine and fine back stitching can hold the heavy part as well.


Friday 13 April 2012

Easter 2: The Hood Top


While I am getting bored to making french seam, I was also making the Hood Top. It is the easiest piece in my 2 outfits and because it does not make me hustle.
For some reason, I did not put lining for this 'top'. Usually, when we use wool, we need to put lining because the rough texture. However, I wanted it not to be like outerwear, even it is big and warm, somehow, be just a top. And I thought this design would not suit to put lining. I wanted to show the skill for hiding all seam allowance nicely.  (Do not worry, you can see my lining skill in the Fire Feather Coat.)  I also do not like to use overlock machine, especially, if the module requires high skill for hand sawing. In my opinion, overlock makes the garment looks high-street level (Of course, product line designs have to use it though!).
Anyway, the aim for this top is to get used to draping and hide seam allowance cleverly.


A short process from the alteration to finishing the garment is here.

.


Monday 9 April 2012

Easter 1: Let's make a range plan!


I love computer works. I studied how to use Photoshop and Illustrator just last year, by myself.
It was very difficult when I was using Illustrator, but I realized that we just need to be used to.
I drew an very easy shape (Like a pencil skirt) everyday, before go to bed, it had been done for a month, then, I became to draw anything I want.

So this time is a kind of Easter special! (you don't have to count this post as a submission, if you think it doesn't suit)
I am going to show how I am making flats.


 First, I need to draw a flat by hand. 


Szkutnicka, B (2010) Technical Drawing For Fashion. London. Laurence King


This book is what I studied drawing flat from super beginner. I'm always recommending to everybody.
It tells how to drawing flat very precise and easy way.


Anyway, I just draw a half if it is a symmetry silhouette. I also need a back as well.


Then scan the hand drawing ones into a computer, open with Photoshop first, to make sure it is right angle. If not, rotate it slightly and match to the blue guide lines.


Then bring them to Illustrator and open as one work.


Then open 'beneric-template' which was attached in the book as CD-ROM, in a same work place but as a different layer. Move the original drawing to fit to the template then Lock both layers.


Then Just draw lines onto the original hand drawing (a half), then mirror to the other half.
I'm not going to tell how to draw lines now because it will take a huge amount of writing. But I am happy to tell to anybody who wants to know. 


After that, bring the work back to Photoshop to make the white background. And now we can play with this work change sizes, put colour in, or making a nice range plan as I did.

Tuesday 3 April 2012

Week 27: Making the Shadow Dress


Finally, I started to make real ones. I chose the Shadow Dress first because it is seemed to take a long time to make. Also I have to be very patient for this because the process is just making french seams forever. I have to sew 74 french seams, it means sew 148 times cut edges 74 times, and ironing 148 times.
I wanted to finish this dress before Easter break, but I could not finish it.

The process what I have done this week is here.


Tuesday 27 March 2012

Week 26-2: Alteration


After the presentation and tutorial, I have got a few alteration except the long shirt. The other four garments are just minor changes, but the long shirt needed to change all patterns slightly. So I decided to make another one for it because it is quicker.
On the other hand, the Shadow Dress was just needed to make sleeves more dramatic. 

The process is in this movie.

Monday 26 March 2012

Week 26-1: Dye the feather!


After I put feather into the clear organza part on my toile, I could estimate how much feathers roughly I need to dye.
I added extra amount (almost double amount) for just in case I made wrong panels, or need to make more samples, or something. It is definitely better than less because I do not want to do dyeing again.

So, I went to the dyeing room with a pillow.


Feather is of course from animal protein, so I used Acid Dye which is used for dyeing silk.

First, I need to soak all feathers with soap water. 


While it absorb water, I prepared 4 bowls for dyeing a lot at once. I thought I could use a dye sink, but I did not want to have a problem which is easy to guess that feather may stuck drain pipes.


Put hot water and a spoonful of salt into each bowl. Wait until nearly boiling.


Put dye from pale yellow powder because simply we cannot dye from darker to lighter colour.
Put feather into the bowls, keep temperature nearly boiling (like wool dyeing), mix slowly and check the colour often.


After it became appropriate colours, scoop them with a sieve and rinse with cold water and squeeze.

The process is simple, but it took a whole day and the horrible chemical smell made me sick.


After dyeing them, drying them up is another nightmare. I needed to mix them up everyday because I had no space to spread out them in no wind. But still, my room became full of feather.


Tuesday 20 March 2012

Week 25-2: The long story of the Fire Feather Coat


This is the final piece which I need to make. I chose black suede for shell and each curve blocks are filled with dyed feathers which show like a fire.
The shape is quite simple (symmetry!) but it is seemed to have a lot of panels.

So, here is the movie of making pattern.


Cutting fabrics took a whole day, then I started sewing and it took 2 days.
Like this coat and the shadow dress, my collection is seemed that I need to do same things for long long time.
Here is making movie for the toile, except lining. 


Monday 19 March 2012

Week 25-1: How to make the big skirt?


The structure is very simple. This skirt is just very big and heavy, should be dramatic.
It describes a heap of something in a corner of a street, or layered rags and clothes which homeless may put on. The huge shape has a certain existence but it also will be fusing into an ordinary street scene, like people don't care about homeless much. It is a 'shapes but no shape' or 'existence but not recognizable (or try not to?)'. 
The silhouette is also unclear and almost random shape. It opposites to white collars who wear neat tailored suits. It represents a style lower than casual wear, just rag, to describes people's poverty in The Great Depression.

Anyway, let's have a go!


Tuesday 13 March 2012

Week 24-2: The Hood Top


The aim of this top (jacket?) is to get used to doing draping method. I am not familiar about this way but of course it better to be able to do both equally. Because these kind of loose fit styles are actually hard to make patterns from basic bodice shape. Draping is enable to create much more organic and spontaneous silhouettes.

Anyway, let's have a go!


Monday 12 March 2012

Week 24-1: The Shadow Dress 2


During class, I started making Layer 2. I also found a mistake around left armhole shape.
The both armhole line should be same because my master pattern was symmetry. But It became asymmetry. It was because I changed the left armhole shape too much last week. So Right side and left side had became different shapes.
The process is in this movie.


Correcting the problem took long time (most of time for unpicking french seams).
I measured again and again, double check, then finally I could solve the problem.
After that, I put sleeves, bolero part and collar.
The process is in this movie.


Tuesday 6 March 2012

Week 23-2: The Shadow Dress 1


The next piece is the shadow dress. I tried to represent negative feeling like anxious for future, no energy, hollow emotion, young people's uncertain life style as the thin layered dress. Layer 1(the basement dress) and Layer 2 (angular layer) have free curve french seams (like winter branch) in the same position. But they do not stay in the same place because the fabric is thin and feeble. The unstable silhouette describes my theme and make vague shadows.

This week, I have done from making pattern to layer 1.
All process and notations are in this movie.


Monday 5 March 2012

Week 23-1: Sewing the long shirt


Just cut, just sew... dealing with chiffon takes extra time and care but nothing difficult. Just I needed to concentrate on and continue.
The sewing process is in this movie.


Tuesday 28 February 2012

Week 22: Start making toiles


[6 outfits]
I changed some parts of these. First, I added the orange jacket to work with the fire feather coat. I also added layered heavyweight fabric top to match to the big skirt. A translucent shadow dress was added for underneath of the jacket and the coat. I am not sure the orange shoes.

I am going to make 2 outfits of the right side. A long shirt, a dress, a hood top, a skirt and a coat.
Because,
1. Everybody loves the fire feather coat. 
2. I love the idea of the shadow effect dress which is underneath of the coat.
3. The big skirt is dramatic and good practise for draping.
4. I love the hood top shape and it make this 2 outfits fit to my theme more.
5. I make a shirt because of the outfit. 


[Make the long shirt]


I started making pattern for the long shirt. Fabric is going to be silk chiffon. The structure is quite basic (classical?). It is good practise for reviewing basic knowledge about hiding darts into seams, gather, flare, raglan sleeve, asymmetrical hem, etc...

The process is in this movie in 57 sec. with some notations.